Record Keynote or PowerPoint Without Black Bars on Mac (Free)
Jun 17, 2025
If you've tried to record your screen on a MacBook Pro or Air for a presentation, you’ve probably seen it: Black bars at the top and bottom of your video. You didn’t mess up. The problem is the screen.
TimeBolt’s Smart Crop™ feature in Screen Recorder detects your Mac screen’s native resolution, then crops a centered 16:9 frame in real time before you start recording. No dragging. No resizing. No watermark.
Vendy Steinberga, a YouTube educator with over 24,000 subscribers, and who trains new creators using TimeBolt, brought the problem to us directly. Every time her students recorded natively on a MacBook, the results came back letterboxed. Her request was simple:
"Can you fix this without workarounds, external monitors, or editing in post?"

Why MacBook Screen Recordings Have Black Bars
MacBooks don’t use the standard 16:9 aspect ratio that video platforms expect.
Here are the native resolutions of common Mac models:
-
MacBook Pro 14": 3024×1964 (16:10)
-
MacBook Air M2: 2560×1664 (16:10)
But nearly every platform—YouTube, Vimeo, LinkedIn, TikTok—expects a 16:9 video frame like 1920×1080. When you record your full screen and upload it, the video doesn’t match the platform’s frame. That’s where black bars come from.
The issue becomes especially noticeable when recording presentations made with Keynote or PowerPoint set to standard widescreen (16:9) slide dimensions. The Mac’s taller 16:10 display captures extra vertical space outside the presentation frame. As a result, screen recordings of presentations include unwanted black bars or letterboxing unless cropped to 16:9 slide aspect ratio.
This is where TimeBolt’s Smart Crop™ feature automatically crops the recording to a centered 16:9 frame and no additional editing.
Common Fixes Fall Short
Here’s how creators, educators, and professionals are forced to deal with this today.
1. Loom (Auto-Crop with Quality Loss)
Loom auto-crops your screen recording to 16:9. But the trade-off is quality. Loom records in the cloud and compresses your video during the process. What you gain in convenience, you lose in clarity.
(But while we're on the subject, who wants to receive a 10 min unedited Loom? Send a Banger instead.)
2. OBS Studio (Manual Resize and Settings Configuration)
OBS gives full control. But also full complexity. Here’s what it takes to remove black bars in OBS:
-
Add a Display Capture source
-
Resize and reposition the capture box manually
-
Use the arrow keys to center it
-
Go into Settings → Video and manually type a 16:9 resolution
-
Match canvas and output resolutions
-
Test, adjust, and repeat
A YouTube tutorial literally says: “We press and hold the left key and drag this one... then change the base resolution... then move this to the middle…”
3. External Monitors
Some users plug in a 16:9 monitor just to get clean screen recordings. That adds hardware, setup time, and reduces mobility. Plus the cost of a screen.
4. Cropping in Post
The final fallback is cropping the video afterward in editing software. This adds friction and reduces speed.
5. Descript (Manual Aspect Ratio Selection and Cropping in Post)
Descript includes a built-in screen recorder, but it doesn’t automatically handle aspect ratios. By default, it records your full MacBook screen—so you’ll get black bars if your screen isn't already 16:9 (like every modern MacBook).
To avoid black bars, here’s what you have to do:
-
Manually select the screen area during recording and try to match a 16:9 ratio (no guide, no preset).
-
After recording, open the Clip Inspector and manually crop and zoom to get rid of the black bars.
-
Adjust width and height values without breaking the aspect ratio.
-
Export, then preview to see if you actually got it right.
This isn’t automation. It’s extra work.
Bottom line: You have to think about aspect ratio before and after recording. And even then, you’re guessing.
Verdict:
✔️ Can technically remove black bars
❌ Doesn’t prevent them
❌ Manual crop required
❌ No preset aspect ratios
❌ Not beginner-friendly
❌ Adds editing time just to fix what shouldn’t be broken

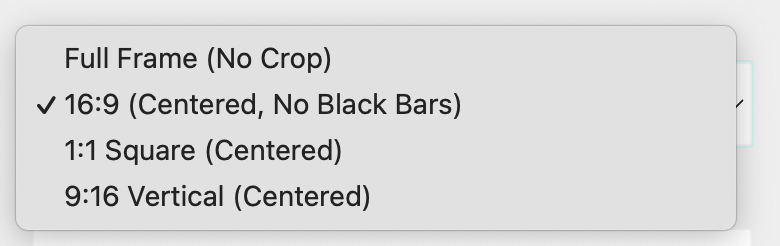
TimeBolt’s Screen Recorder Is Free And Save Without Watermark
Smart Crop™ is built into TimeBolt’s free screen recorder for Mac and Windows.
Here’s what’s included:
- Webcam, mic, and multiple screen capture
- Record in HD or Quick File Size (Mac)
- Smart Crop (auto 16:9 framing on non-standard displays)
- Square (1:1) crop mode for LinkedIn and Instagram
- Vertical (9:16) crop mode for Reels, Shorts, and TikTok
- Toggle between full screen and thumbnail shots
- Live camera switching during recording
- Offline desktop recording
- Camera Only Source (camera resolution not bottlenecked by screen size)
- Sync Offset (Add a delay to fix any audio / video sync issues with external mic and DSLR)
- No watermark
Download
Simply download the free version of TimeBolt with Capture included.
